Friday 30 May 2014

CORE DBA - USER MANAGEMENT USEFUL COMMANDS

  1. checking the newly created user profile type
          SELECT USERNAME , PROFILE FROM DBA_USERS WHERE USERNAME='USER';


                       USERNAME        PROFILE
                       ----------- ------------------- ------------------------------
                          EX        DEFAULT

   2.   checking the encrypted form of password of user

             SELECT NAME,PASSWORD FROM  SYS.USER$ WHERE  NAME='USER';

                        NAME        PASSWORD
                    ------------------------------ ------------------------------
                          EX        DC6300AB63DA29DF


Saturday 17 May 2014

Installation of Oracle Virtual Box

Download Oracle Virtual Box at  Virtual BOX download
Creating the virtual machine
Start Oracle VM VirtualBox Manager and select Machine → New from the top menu.

Give the virtual machine a name (mine is called “Database 12c” or 11g ), set its type to Linux and the version to Oracle. Click Next
db12c_install_5.png (430×382).
Set the amount of RAM to 2048 MB and click Next.

Leave the “Create a virtual hard drive now” option selected and click Create.
Leave the HDD type to VDI and click Next.

Leave the allocation type to “Dynamically allocated” and click Next.

Name the disk “Oracle Linux Root” and set its size to 20 GB. Click Create.


This is the final step of the VM creation wizard, so you should see the newly created VM in your list of virtual machines. Select the machine and choose Machine → Settings from the top menu. This will open the Settings screen where we can setup additional resources.
Select Storage from the list and then select Controller from the storage tree. Click the Add hard disk button (that’s the one that looks like a set of disk plates with a green plus sign on top of them).
You should now see two disks attached to your SATA controller. Time to attach the Linux ISO.
Select the Empty item under your IDE controller and then click “Set up the virtual CD/DVD drive” button (the one that looks like a CD, next to the “CD/DVD Drive” drop-down list). This will open a list of commands. Select “Choose a virtual CD/DVD disk file” from the list.
The ISO image appears under your IDE controller.
Our final task is to set up the machine networks, so you can comfortably interact with it while still having internet access from inside the VM. Click Network from the list on the left.


Set Adapter 1 to “Host-only Adapter” and make sure the “Enable Network Adapter” option is checked. Then click the “Adapter 2” tab.
Enable the second adapter and set its “Attached to” option to NAT. Click OK.
The virtual machine is now fully configured. Time to boot it up and start the Linux installation.


Installation of ORACLE LINUX 6 in ORACLE VIRTUAL BOX

Hi.. folks.... Here in this articles i will clearly show you how to install oracle linux 6 in virtual machine along with screenshots... :)

All you need to do is 

1) Download Virtual machine from the site     Virtual BOX download. If you want to know the installation of Virtual box .Here You u go  

2) Now you need to install ORACLE LINUX 6  server on top of virtual box.

3) For this you need to download  ORACLE LINUX 6  .iso  image here  Oracle Linux 6 iso image 

download . Download that 3.5 gb iso file .see the below screenshot


Installing Oracle Linux 6

Select the newly created VM and click Machine → Start from the VirtualBox Manager’s menu. This will start the virtual machine and it will automatically boot from the Oracle Linux ISO image.

Automatically after sec over..it gives next screen

db12c_install_22.png (720×400)


Skip the media testing by selecting Skip


The installer will boot into graphical mode. Select Next.
Select English (English) and click Next.
Language
select the relevant keyboard setting, then click the "Next" button.
Keyboard

Select the storage option necessary for the installation, then click the "Next" button.

Storage

Click the "Re-initialize all" button on the disk initialization warning dialog.

Disk Partitioning Warning

Enter a fully qualified host name, then click the "Configure Network" button.

Hostname

Highlight the relevant connection and click the "Edit" button.

Network Connection


Check the "Connect automatically" checkbox. If you are not using DHCP, click on the "IPv4 Settings" tab, set the method to "Manual", click the "Add" button and enter the appropriate network details. When you are happy with the details, click the "Apply" and "Close" buttons to return to the host name screen, then click the "Forward" button.


Editing System eth0

Select the relevant time zone by clicking on your nearest city on the map. Click on the "Next" button to proceed.

Time Zone


Enter a root password for the server, then click the "Next" button to proceed.

Root Password

Disk PartitioningCheck the partitioning type you require. If you want to amend the default partitioning layout, check the "Review and modify partitioning layout" option. Click the "Next" button.


Installer will list the default partitioning scheme for your size disk. Amend them as required and click the "Next" button, then the "Format" and "Write changes to disk" buttons on the following dialogs.

Disk Setup

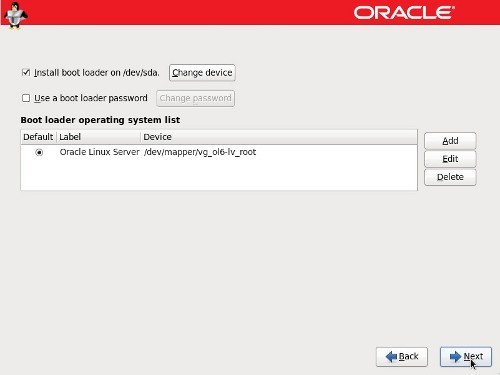
Accept the boot loader settings by clicking the "Next" button.

    Boot Loader

  1. Package Installation Defaults
Accept the "Basic Server" installation and check the "Customize now" option, then click the "Next" button.
for practice purpose u can prefer Software development or any other availabilities of  your wish.

The "Package Group Selection" screen allows you to select the required package groups, and individual packages within the details section. When you've made your selection, click the "Next" button. If you want the server to have a regular gnome desktop you need to include the following package groups from the "Desktops" section:
  • Desktops
  • Desktop
  • Desktop Platform
  • Fonts
  • General Purpose Desktop
  • Graphical Administration Tools
  • X Windows System
Package Group Selection

Wait for the installation to complete. It takes a bit more time.

Installing Packages


Click the "Reboot" button to complete the installation.

Congratulations


On the "Welcome" screen, click the "Forward" button.

Welcome

Accept the license agreement and click the "Forward" button.

License Agreement

Pick the desired ULN Registration option, then click the "Forward" button. In this case we will pick the register later option.

Software Updates


Click the "No thanks, I'll connect later." button.

Software Updates Confirm


Finish the software updates setup by clicking the "Forward" button.

Software Updates Finish

Enter the details for system user, then click the "Forward" button.


Adjust the Date and Time settings if necessary, and click the "Forward" Button.

Date Time


Accept the default setting on the Kdump screen by clicking the "Finish" button.

Kdump

Next, you are presented with the login screen. Log in by clicking on the user on the login screen.

Login

Once logged in, you are ready to use the desktop.

Desktop


Now go to the Devices menu of VirtualBox Manager and select “Install Guest Additions…”.


VirtualBox will mount the additions installation under /media/VBOXADDITIONS_version_number. Go to this directory and launch the installation.

[root@ol6 VBOXADDITIONS_4.2.16_86992]# ./VBoxLinuxAdditions.run
Verifying archive integrity... All good.
Uncompressing VirtualBox 4.2.16 Guest Additions for Linux............
VirtualBox Guest Additions installer
Copying additional installer modules ...
Installing additional modules ...
Building the VirtualBox Guest Additions kernel modules
Building the main Guest Additions module                   [  OK  ]
Building the shared folder support module                  [  OK  ]
Building the OpenGL support module                         [  OK  ]
Doing non-kernel setup of the Guest Additions              [  OK  ]
Starting the VirtualBox Guest Additions                    [  OK  ]
Installing the Window System drivers
Installing X.Org Server 1.13 modules                       [  OK  ]
Setting up the Window System to use the Guest Additions    [  OK  ]
You may need to restart the hal service and the Window System (or just restart
the guest system) to enable the Guest Additions.

Installing graphics libraries and desktop services componen[  OK  ]
[root@ol6 VBOXADDITIONS_4.2.16_86992]#

Reboot the guest to enable the Guest Additions.

The virtual machine is now fully configured. Time to deal with the Oracle Database 11g or 12c installation.


Monday 12 May 2014

Installation of Oracle 11gr12 in Oracle Linux 6 through Virtual Box

I think its a bad practice to install oracle 11g/10 or any db directly on your main machine . So better go for virtual box  . Download Oracle virtual Box here https://www.virtualbox.org/wiki/Downloads and do the installation on your main machine.

Its better to install 11gr12 on oracle Linux 6 through virtual Box because prior to that you need to assure that whether your choosen guest OS is supported by oracle DB or not .11gR12 works fine for Fedora,redhat,solaris,Oracle Linux(ol6) but not ubuntu perfect. So for practice purpose I opted for Oracle linux Server 6.

Below is the installation process for " Installation of Oracle 11gr12 in Oracle Linux 6 through Virtual Box "
Explained you clearly along with Screenshots .. enjoy :)

Hosts File 


The "/etc/hosts" file must contain a fully qualified name for the server.

<IP-address>  <fully-qualified-machine-name>  <machine-name>
For example.
127.0.0.1       localhost.localdomain  localhost
192.168.0.181   ol6-112.localdomain    ol6-112

Oracle Installation Prerequisites


 Perform either the Automatic Setup or the Manual Setup to complete the basic prerequisites. The Additional Setup is required for all installations.


Automatic Setup

If you plan to use the "oracle-rdbms-server-11gR2-preinstall" package to perform all your prerequisite setup, follow the instructions at http://public-yum.oracle.com to setup the yum repository for OL, then perform the following command.
# yum install oracle-rdbms-server-11gR2-preinstall

Manual Setup

If you have not used the "oracle-rdbms-server-11gR2-preinstall" package to perform all prerequisites, you will need to manually perform the following setup tasks.


Add or amend the following lines in the "/etc/sysctl.conf" file.


fs.suid_dumpable = 1
fs.aio-max-nr = 1048576
fs.file-max = 6815744
kernel.shmall = 2097152
kernel.shmmax = 536870912
kernel.shmmni = 4096
# semaphores: semmsl, semmns, semopm, semmni
kernel.sem = 250 32000 100 128
net.ipv4.ip_local_port_range = 9000 65500
net.core.rmem_default=4194304
net.core.rmem_max=4194304
net.core.wmem_default=262144
net.core.wmem_max=1048586

Run the following command to change the current kernel parameters.
/sbin/sysctl -p
Add the following lines to the "/etc/security/limits.conf" file.
oracle              soft    nproc   2047
oracle              hard    nproc   16384
oracle              soft    nofile  4096
oracle              hard    nofile  65536
oracle              soft    stack   10240

Install the following packages if they are not already present.


# From Oracle Linux 6 DVD
cd /media/cdrom/Server/Packages
rpm -Uvh binutils-2*x86_64*
rpm -Uvh glibc-2*x86_64* nss-softokn-freebl-3*x86_64*
rpm -Uvh glibc-2*i686* nss-softokn-freebl-3*i686*
rpm -Uvh compat-libstdc++-33*x86_64*
rpm -Uvh glibc-common-2*x86_64*
rpm -Uvh glibc-devel-2*x86_64*
rpm -Uvh glibc-devel-2*i686*
rpm -Uvh glibc-headers-2*x86_64*
rpm -Uvh elfutils-libelf-0*x86_64*
rpm -Uvh elfutils-libelf-devel-0*x86_64*
rpm -Uvh gcc-4*x86_64*
rpm -Uvh gcc-c++-4*x86_64*
rpm -Uvh ksh-*x86_64*
rpm -Uvh libaio-0*x86_64*
rpm -Uvh libaio-devel-0*x86_64*
rpm -Uvh libaio-0*i686*
rpm -Uvh libaio-devel-0*i686*
rpm -Uvh libgcc-4*x86_64*
rpm -Uvh libgcc-4*i686*
rpm -Uvh libstdc++-4*x86_64*
rpm -Uvh libstdc++-4*i686*
rpm -Uvh libstdc++-devel-4*x86_64*
rpm -Uvh make-3.81*x86_64*
rpm -Uvh numactl-devel-2*x86_64*
rpm -Uvh sysstat-9*x86_64*
rpm -Uvh compat-libstdc++-33*i686*
rpm -Uvh compat-libcap*


Create the new groups and users.
groupadd -g 501 oinstall
groupadd -g 502 dba
groupadd -g 503 oper
groupadd -g 504 asmadmin
groupadd -g 506 asmdba
groupadd -g 505 asmoper

useradd -u 502 -g oinstall -G dba,asmdba,oper oracle
passwd oracle


Set the password for the "oracle" user.
passwd oracle

Set secure Linux to permissive by editing the "/etc/selinux/config" file, making sure the SELINUX flag is set as follows.
SELINUX=permissive

Create the directories in which the Oracle software will be installed.
mkdir -p /u01/app/oracle/product/11.2.0/db_1
chown -R oracle:oinstall /u01
chmod -R 775 /u01


Login as root and issue the following command.
xhost +<machine-name>

Login as the oracle user and add the following lines at the end of the ".bash_profile" file.


# Oracle Settings
TMP=/tmp; export TMP
TMPDIR=$TMP; export TMPDIR

ORACLE_HOSTNAME=ol6-112.localdomain; export ORACLE_HOSTNAME
ORACLE_UNQNAME=DB11G; export ORACLE_UNQNAME
ORACLE_BASE=/u01/app/oracle; export ORACLE_BASE
ORACLE_HOME=$ORACLE_BASE/product/11.2.0/db_1; export ORACLE_HOME
ORACLE_SID=DB11G; export ORACLE_SID

PATH=/usr/sbin:$PATH; export PATH
PATH=$ORACLE_HOME/bin:$PATH; export PATH

LD_LIBRARY_PATH=$ORACLE_HOME/lib:/lib:/usr/lib; export LD_LIBRARY_PATH
CLASSPATH=$ORACLE_HOME/jlib:$ORACLE_HOME/rdbms/jlib; export CLASSPATH

Start the Oracle Universal Installer (OUI) by issuing the following command in the database directory.
./runInstaller


./runInstaller


After runInstaller : You wil get below screen shots


Important
You may notice that the minimum requirements fail during the testing.

Package:libaio-0.3.105 - This is a prerequisite condition to test whether the package "libaio-0.3.105 is available on the system. List of errors:
PRVF-7532: Package "libaio-0.3.105 (i386)" is missing on node "Localhost"

This is a little miss leading because I noticed that these are 32-bit packages, not the 64bit packages. You installed the 64bit packages because so go ahead and click 'ignore all'


Execute configuration scripts


When you see this screen, you will be required to execute some shell scripts. 

cd /opt/oraInventory/
./orainstRoot.sh
./root.sh


Once you've executed these scripts, carry on with the installation.


Finished Successfully now.